Showing posts with label Beauty. Show all posts

Sunday, December 24, 2017

Acne Clearing Activated Charcoal Face Pack

Hello beauties. I had ordered an activated charcoal face pack, quiet some time ago and I found that it treated my acne pretty well and it also reduced the spots. It was also travel-friendly so that was a bonus. But I happen to be a beauty on a budget, so I decided to DIY it, with the ingredients I had at hand. I have been using my DIY version since a month and let me just say I’m loving it. So without further ado let’s see how to make it.

Ingredients:
Ingredient
Quantity
Multani mitti (Fuller’s earth)
1 tbsp.
Activated charcoal powder
¼ tsp.
Glycerine
½ tsp.
Rose water
2 ½ tsp.
Aloe vera gel
1 tsp.
Clove oil
2-3 drops

(The links to buy activated charcoal powder, clove oil and the face pack on which I based this post are at the end of this article.)

Procedure:
1. Mix all the dry ingredients in a bowl.
2. Add in the wet ingredients. Adjust the consistency according to your like, by adding more rose water. I like a thick face pack, so the quantity of rose water mentioned is okay with me. Be very careful while adding the clove oil because if by chance you happen to add more than a few drops, your skin might feel a slight burning sensation.

3. Apply it on your face and neck and leave it for 15-20 minutes or until it dries out.
You can store this face pack in an air tight container and it will last well for a month. I have put side by side pictures of the pack I made a month ago and the freshly made one. The difference is just of the consistency, which can be adjusted.
          I’ll just quickly talk about the benefits of the ingredients used in the mask. Activated Charcoal helps in clearing out dirt from your skin, fights acne and helps in achieving flawless complexion. Multani mitti is generally good for skin, makes it softer and healthier. Aloe vera treats acne, makes the skin heal faster and reduces scarring. Glycerine is a great moisturiser and rose water is a magic potion for every skin type. But the star here is clove oil, which treats acne and clears out the scars. The overall verdict is that, this pack is ah-mazing.
          So friends, if you do try this out, let me know how it works for you in the comments below. If you have any suggestions or if there is anything you want me to write about, feel free to catch up with me here or on Google+ or on Facebook (https://www.facebook.com/AHappyGirlWrites/) or Instagram (https://www.instagram.com/a,happy.girl.writes/) or on Twitter (https://twitter.com/A_Happy_Girl2) or Mirakee (http://www.mirakee.com/ahappygirlwrites) or Tumblr (https://www.tumblr.com/ahappygirlwrites) or on Pinterest (https://in.pinterest.com/happygirlwrites) or on We Heart It (https://weheartit.com/ahappygirlwrites). Until next time, keep smiling and I will be back soon. Don’t forget to have a happy day.
Links to buy Activated charcoal powder:
You can find clove oil in any beauty supply stores or medical stores. Here is a link to buy it:
Link for the original face pack (which is great by the way, just expensive)

Sunday, December 17, 2017

“Sanskari Definitions” of the Makeup Products


Hello beautiful ladies. Today I am going to talk you through the “standard” description of each of the makeup products that we all are supposed to use, to look “beautiful”. It is written with a hint of sarcasm, slight bit of exaggeration, mostly irony but whole lot of reality. So read it on and be sanskari.
Alright ladies, let’s begin by priming our face. Primer is used to help the makeup adhere to your face, just like you should adhere to the norms and rules, laid down by the society. After applying it evenly, we move on to the foundation. Use a shade that is at least two shades lighter than your skin tone, that is because “fair is beautiful”. Apply it all over your face, neck and your entire body. The next step is concealer. This is the most important step, it helps you cover your “imperfections” and “flaws”. Conceal it all just as you conceal your aspirations, dreams and everything else. Set everything up with a powder. It will help your makeup “stay in place”.
Next we move on to contouring, which is nothing but achieving the “Kardashianesque” face, that everyone is obsessed with, these days. Being fat is not an option, so contour your nose, your cheeks, you belly, breasts, butt, everything. Just slim it down girl. Then go ahead and apply a blush that will make you look coy, sweet and “pretty girly”. The last step to complete the face makeup is highlighter, which will make your features stand out and shine, unlike you, girl. You aren’t allowed to shine.
We now move on to eyes and lips. First use the eyebrow powder/pencil to define your brows, whatever you do, just don’t let the society arch theirs. Next apply the eyeshadow and no matter how many shades you use, remember to “blend in” everything really well, just like you are always asked to. The next step is eyeliner, wing it out ladies, but never use those wings to fly, because that isn’t allowed. Finish the eye makeup with a coat of mascara, and there you go, you have got pretty looking eyes. Your eyes are supposed to be the window to your soul, but it really doesn’t matter what kind of soul you are, it’s just your outer beauty that matters. The final step is lipstick. Choose a shade that isn’t too “bold” and that would in turn draw “attention” to you, so keep it simple. Also remember to keep the lipstick “within the boundaries” of your lips. And that my dears brings us to the end of the makeup routine. A final word, keep all your products and makeup brushes “clean”, just like your character.

Let me just clarify that I am not against makeup, contrarily I love makeup. I am against the “standards” that we girls are supposed to meet. I believe that everyone is beautiful and unique and fitting into “definitions” isn’t okay with me. I just used the makeup products to make my point. So girls, if you agree with me or if you think I missed to mention some products, let me know in the comments below.  If you have any suggestions or if there is anything you want me to write about, feel free to catch up with me here or on Google+ or on Facebook (https://www.facebook.com/AHappyGirlWrites/) or Instagram (https://www.instagram.com/a,happy.girl.writes/) or on Twitter (https://twitter.com/A_Happy_Girl2) or Mirakee (http://www.mirakee.com/ahappygirlwrites) or Tumblr (https://www.tumblr.com/ahappygirlwritesor on Pinterest (https://in.pinterest.com/happygirlwrites) or on We Heart It (https://weheartit.com/ahappygirlwrites). Until next time, keep smiling and I will be back soon. Don’t forget to have a happy day J.

Sunday, November 19, 2017

DIY Activated Charcoal Peel-off Face Mask

Hello beauties. Today I have an easy activated charcoal face mask recipe for you all. The charcoal masks that you find in beauty stores aren’t exactly cheap, so I DIYed it with just three ingredients, I call beauty on a budget. So without further ado let’s see how to make it.
Ingredients:
Ingredient
Quantity
Gelatin
2 tsp.
Raw milk
1 ½ tbsp.
Activated charcoal powder
1/4 tsp.
(The links to buy activated charcoal powder and gelatin are at the end of this article.)
Procedure:
1. Mix all the ingredients in a steel bowl.
2. Put this bowl over a water bath. In simpler words put it in a larger container filled with hot water, so that the smaller bowl is only half immersed in it.
3. It will take around 2-3 minutes for the gelatin to melt completely. In the end you should get a smooth paste.
4. Apply it on your clean face with an old face pack brush. It is better if you apply the mask from top to bottom, so it is easier to remove.
Remember to keep it away from your eyes, eyebrows and hairline. You can apply Vaseline to your eyebrows and hairline so that the mask doesn’t stick to it. In case the mask still gets into the unwanted places, after it has dried, use hot water to remove it.
5. Let it dry completely, this will take around 20 minutes. Then peel it off very slowly and gently, firstly loosen the mask by gently tugging the ends and creating air gap in it. Take your time in removing it off your skin. It’s tough to peel it off, but trust me the effort is worth it.

6. After you have peeled it off, wash your face with cold water, to close the pores. And there you have your skin looking soft and glowing.
I’ll just briefly put in the benefits of the ingredients used in the mask. Activated Charcoal helps in clearing out dirt from your skin, fights acne and helps in achieving flawless complexion. Raw milk makes your skin look younger and healthier. It also helps in evening out the skin tone and acts as a moisturizer, so it’s great for the winters. Gelatin makes your skin softer and tighter, tell me who doesn’t want that? So to summarize it all, this pack is for softer, healthier and clearer looking skin. I have been in love with this pack, as it helped me clear out the white heads on my skin. You can use this mask twice a month.
So friends, if you try this out, let me know how it works for you in the comments below. If you have any suggestions or if there is anything you want me to write about, feel free to catch up with me here or on Google+ or on Facebook (https://www.facebook.com/AHappyGirlWrites/) or Instagram (https://www.instagram.com/a,happy.girl.writes/) or on Twitter (https://twitter.com/A_Happy_Girl2) or Mirakee (http://www.mirakee.com/ahappygirlwrites) or Tumblr (https://www.tumblr.com/ahappygirlwritesor on Pinterest (https://in.pinterest.com/happygirlwrites) or on We Heart It (https://weheartit.com/ahappygirlwrites). Until next time, keep smiling and I will be back soon. Don’t forget to have a happy day J.
Links to buy Activated charcoal powder:
You can find gelatin in the bakery section of any super market, it also is called as jello, just look for the unflavoured one. If you can’t find it here is a link to buy Gelatin powder:

Sunday, September 10, 2017

Rice Flour Facepack

Hello beauties. Today I have an easy tan removal face pack recipe for you all. It is made with the ingredients that can be easily found in your kitchen aka beauty on a budget. So without further ado let’s see how to make it.
Ingredients:

Ingredient
Quantity
Rice flour
2 tbsp.
Multani mitti (fuller’s earth)
1 tbsp.
Turmeric
A pinch
Raw milk
3-4 tbsp.
Tomato juice
1 tbsp.


Procedure:
1. Mix the rice flour, multani mitti and turmeric in a bowl. Reduce the quantity of turmeric if its deeper shade of yellow as it might stain.
2. Add in the tomato juice. To make the juice, just slice 1 small tomato and put it in the mixer. Strain the mixture to remove the seeds.
3. Finally add in the raw milk until you get a smooth paste.
4. Apply the pack on your face and neck. Leave it until it dries completely and then remove it with lukewarm water. You can also use a towel dipped in lukewarm water (if you are okay with turmeric staining it).
You can also use this pack as a body pack, increase the quantity of ingredients accordingly.
        Let me tell you why this pack works. It contains raw milk which has been found to be loaded with nutrients which help your skin look younger, healthier and helps in evening out the skin tone. The magical ingredient called turmeric needs nothing but love and more love. I use it in most of my facepacks for its numerous benefits for every skin type. Rice flour acts as an exfoliating agent aka scrub. It helps in smoothing your skin and also helps in skin lightening. Multani mitti has been used since ages for glowing skin. Tomato juice is great for tanning as well as for skin discoloration. So this pack is loaded with all natural ingredients which help you get rid of that sun tan and get a heathier looking skin.

So friends, I am sure you will try this out and if you do, let me know how it works for you in the comments below. If you have any suggestions or if there is anything you want me to write about, feel free to catch up with me here or on Google+ or on Facebook (https://www.facebook.com/AHappyGirlWrites/) or Instagram (a.happy.girl.writes) or on Twitter (A_Happy_Girl2) or Pinterest (ahappygirlwrites) or Tumblr (ahappygirlwrites) or on We Heart It (ahappygirlwrites). Until next time, keep smiling and I will be back soon. Don’t forget to have a happy day J.

Sunday, November 13, 2016

Moisturising Panchamrut Face Pack

Hello everyone. I hope you all are having a great day. Winter has come in full force, so I thought I would give you all a moisturising face pack recipe that contains all natural ingredients and it is super easy to make. Panchamrut literally translates to nectar and it contains milk, curd, sugar, honey and ghee. Sugar works as a gentle exfoliant and rest of the ingredients help your skin retain its moisture and overall it is a great skin cleanser and it also helps to brighten your skin. So let’s get started. Here is what you will need,


Ingredient
Quantity
1.
Rice flour
2 tbsp.
2.
Sugar (powdered)
1 tbsp.
3.
Milk
1 tsp.
4.
Curd
1 tsp.
5.
Honey
½ tsp.
6.
Ghee
¼ tsp.

Procedure:
1. Mix the dry ingredients viz. flour and powdered sugar.

2. Add in the wet ingredients. The consistency of the pack should be like a thick moisturiser.

3. Apply a thin layer of the pack on your face and neck. Apply the remaining pack on your hands and feet. Let is dry completely. Then put teeny tiny amount of water on your palms and use a scrubbing motion to remove the pack.

          This pack will gently scrub your skin along with hydrating it. It contains all natural ingredients so it will hopefully work on all skin types, even the sensitive skin. If you try out this pack, let me know how it works for you. If you have any suggestions or if there is anything you want me to write about, feel free to catch up with me here or on Google+ or on Facebook (https://www.facebook.com/AHappyGirlWrites) or Instagram (a.happy.girl.writes) or on Twitter (A_Happy_Girl2) or Snapchat (ahappy.girl). Till next time, keep smiling and I will be back soon. Have a happy day J.

Friday, October 28, 2016

Easy Diwali Nail Art


Hello everyone and first of all let me wish you all a very Happy Diwali. I hope each one of you has a safe Diwali, stay away from crackers and celebrate an eco-friendly Diwali. Today I have an easy nail art to share with you all. I mean if a not so artistic person like me can do it, anyone can do it. 

So let’s get started. Here is what you will need,
1. Base coat (Rimmel “Nail Nurse Stronger Nail Base Coat”)
2. Golden nail polish (Maybelline glitter mania in “All That Glitters”)
3. Red nail polish (OPI “Innie Minnie Mighty Bow”)
4. Yellow nail polish (Maybelline “Sweet Sunshine”)
5. Brown nail polish (Elle 18 “No 64”)
6. White nail polish (Maybelline “Porcelain Party ”)
7. Orange nail polish (Maybelline “Orange Fix”)
8. Clear nail polish (Maybelline “Crystal Clear”)
9. Round bottom tooth picks
I was trying to make the shape of a diya with nail polishes, but I failed miserably #sadface.
Procedure:
1. Apply the base coat on all of your nails, this is just going to protect your nails from the colours that we will add on the top.
2. Apply golden nail polish on all the nails except the ring finger (you can also paint the diya on more fingers, I just used my ring finger as an accent finger). Let it dry completely.
3. Add two dots with the tooth pick using the red and yellow nail polishes, the upper one smaller than the other (Yellow and red are the colours of haldi and kumkum so I used those). Repeat on all the nails except the ring finger. {Picture no. 1}
4. Paint the accent nail with a white nail polish and let it dry completely.
5. Make three dots side by side with brown nail polish and tooth pick. {Picture no. 2}
6. Make two dots between the three dots with the same brown colour. This will create the diya (I fixed up mine later just by gently dragging the tooth pick until I get the desired shape). {Picture no. 3}
7. Apply an orange dot above the brown, this will make the base of the flame. {Picture no. 4}
8. Gently drag the tooth pick with yellow colour on it to complete the flame. Let it dry completely. It usually takes a lot of time so just let it stay there, do your work and get back to it later. {Picture no. 5}
9. Apply clear nail polish on the accent nail and there you go you have a tiny diya on your nails.
So this is my Diwali inspired nail art. I hope you liked it and if you decide to recreate this or if you have any other design, then send me a photo of it on any of the social media. I hope you all have a great Diwali and I will catch up with you soon. If you have any suggestions or if there is anything you want me to write about, feel free to catch up with me here or on Google+ or on Facebook (https://www.facebook.com/AHappyGirlWrites) or Instagram (a.happy.girl.writes) or on Twitter (A_Happy_Girl2) or Snapchat (ahappy.girl , even though I am very new to that). Till next time, keep smiling and have a happy day J.

Sunday, August 16, 2015

Independence Day Nail Art

Hello all you beautiful girls. First of all I wish you all a very Happy Independence day. Today on the occasion of India’s 67th Independence Day I have an Indian Tricolour themed nail art. So let’s get started.
You will need:
1. Base coat (to protect your natural nails)
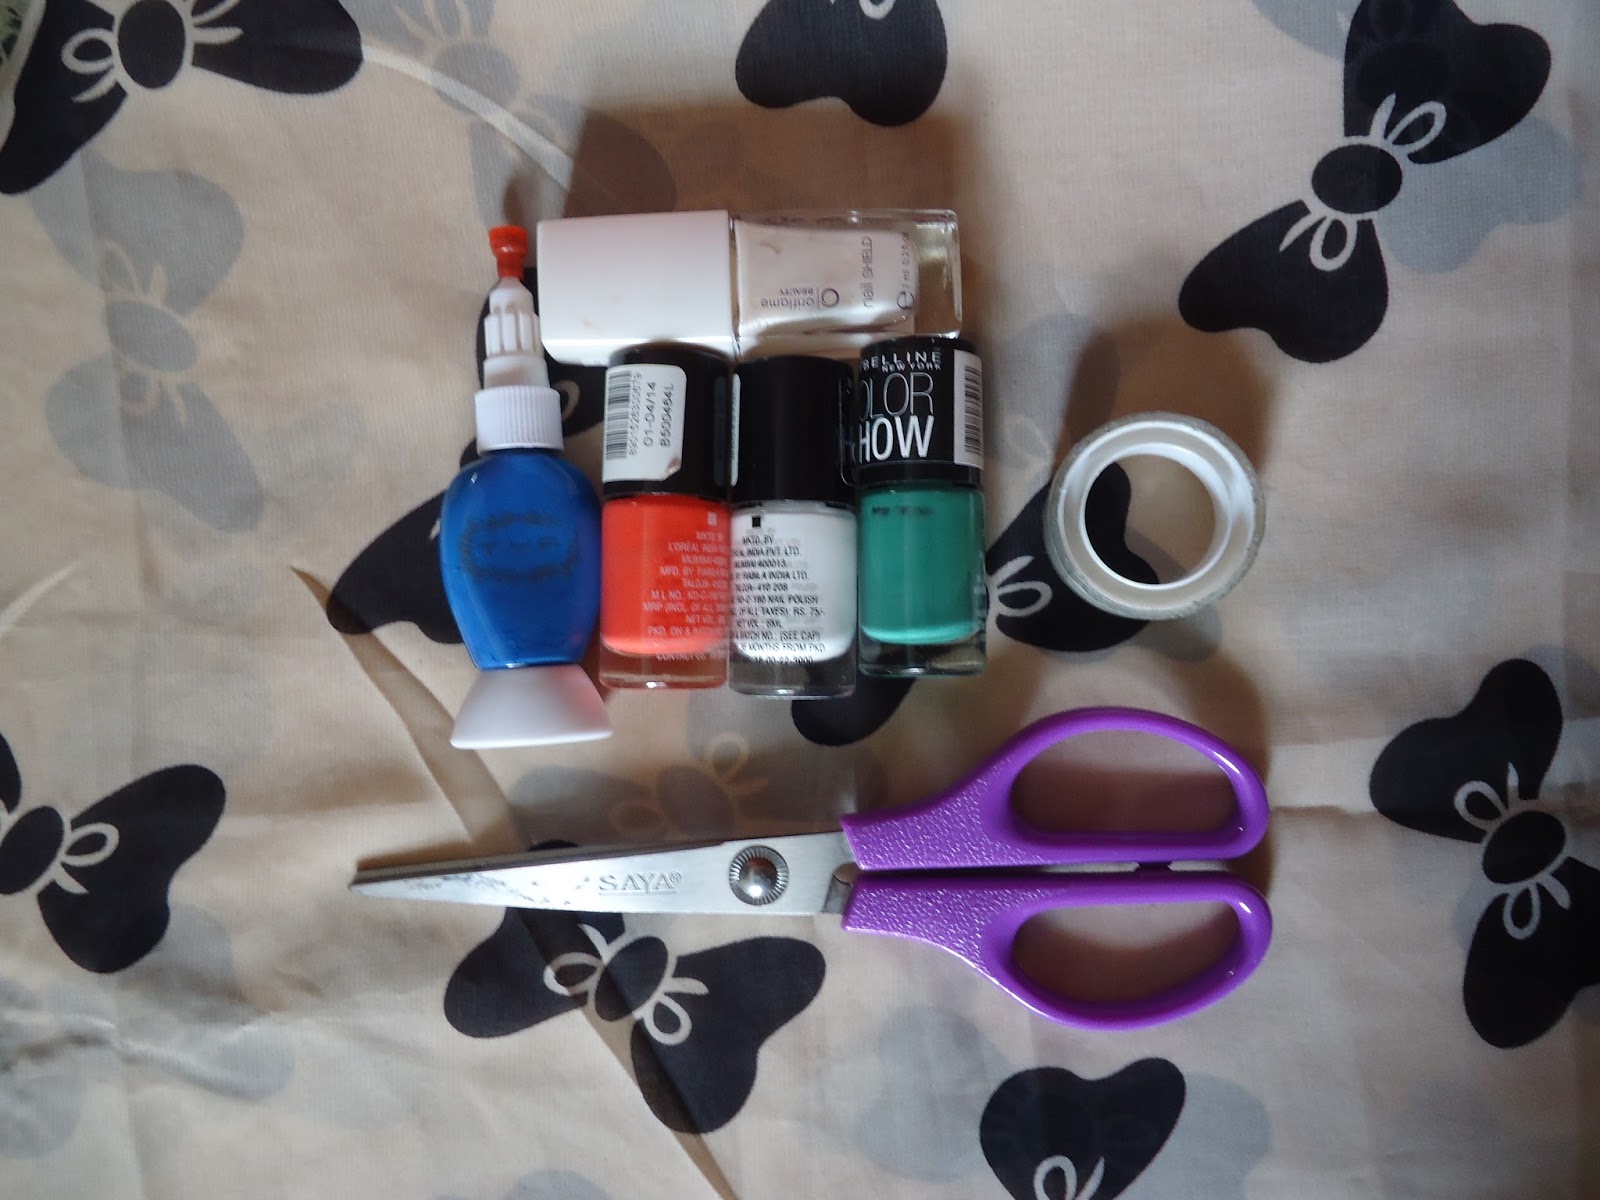
2. Saffron nail polish (Maybelline colorshow 214 Orange Fix)
3. White nail polish (Maybelline colorshow 102 Porcelain Party)
4. Green nail polish (Maybelline colorshow 301 Tenacious Teal)
5. Blue nail polish & a tooth pick OR Blue dotting tool
6. Cello tape & pair of scissors
7. Transparent top coat (optional)
Procedure:
1. Apply base coat to protect your natural nails.
2. Apply an opaque coat of white nail polish. Let it dry completely. This may take 10-15 minutes.
3. Cut a small piece of cello tape equal to one-third of your nail. Apply it on the middle portion of your nail.
4. On the top portion apply saffron nail polish & immediately apply green nail polish.
5. Remove the cello tape as soon as you finish applying both the polishes.
6. Apply a small dot of blue nail polish in the middle & there you go you have the Indian tricolour on your nails.
7. Clean the nail polish around the nails.
8. Let all the polished dry completely and then apply a coat of transparent nail polish.
So friends I hope you like this simple DIY nail art. If you give it a try, please post a picture of your recreation on my facebook page. Goodbye my dear friends and I will see you soon. Until then Keep Smiling. Please do follow my blog, like the facebook page (https://www.facebook.com/pages/A-Happy-Girl/292903830872974?ref_type=bookmark) and follow me on twitter (https://twitter.com/A_Happy_Girl2). If you have any suggestions or questions, please do comment down below.